
The best part? You can have it up and running in a matter of minutes.
The very first step you need to do is sign up using a web host and register the domain name of your choice (if you don’t have one yet)
Feel free to use any hosting provider of your choice, but I prefer Bluehost for its simple usability, reliability and 1-click-installation with WordPress. It makes integrating WordPress easier than I have ever seen with any other web host.
If you’ve already have a domain name, it’s just as simple. You can still use Bluehost as your hosting provider, even if you purchased your domain name from another provider e.g GoDaddy.
The registration process takes no longer than 5 minutes from start to finish.
Once you’ve created an account with Bluehost, I’ll explain how you can install WordPress using the Bluehost control panel
Quick tip: When creating any website, you must have a domain name and a host. Without these, you won’t be able to create a website for users to view, browse, or shop on.
STEP 1: Go to Bluehost.com
To get started, head to www.Bluehost.com and click on the “get started now” button.
· If you use this link, you’ll be able to get a FREE domain for a year, too. This discount applies to all Binnareviews visitors
A free domain (1 year), 1-click WordPress installation, and 24/7 support are included with your account.
STEP 2: Choose a Website Hosting Plan
Once you click “get started now,” you’ll be taken to a page where you can select the hosting plan of your choice.

I got the “basic” option, which is a great choice for new websites for $3.95/month (usually it’s $7.99/mo)
The “plus” and “prime” plans are great, but you don’t really need all the extra bells and whistles they offer unless there are millions of people flooding your site each day.
Save your hard earned cash and opt for the cheapest package to start with.
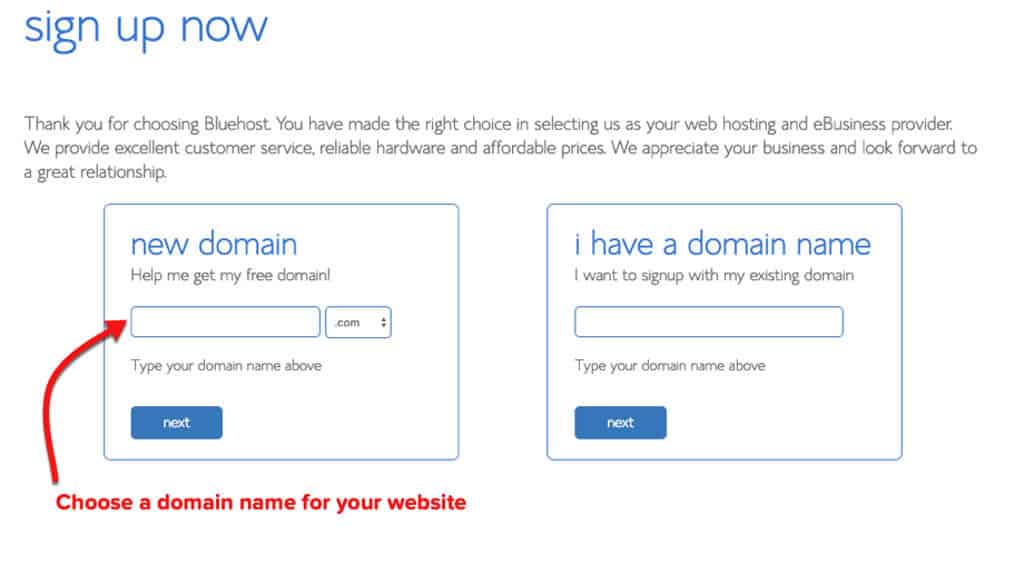
STEP 3: Secure a Domain Name
Your domain doesn’t have to end in .com. You can choose a different site ending if you wish, e.g .net, .org, .us, .biz, and .info if the first choice for your domain isn’t available.
If you’ve already got a domain name, just enter it in and click “Next” in the “I have a domain name” form.
If you aren’t ready to choose a domain right this moment, you can do it at a later point in your website setup.
STEP 4: Fill In Your Details
To create your account, just enter your personal information on the “create your account” page.
You’ll need to add your first name, last name, country, street address, city, zip code, phone number, and email address. Your receipt will be sent to the email address you enter.
It’s optional to also add your business name in this form.
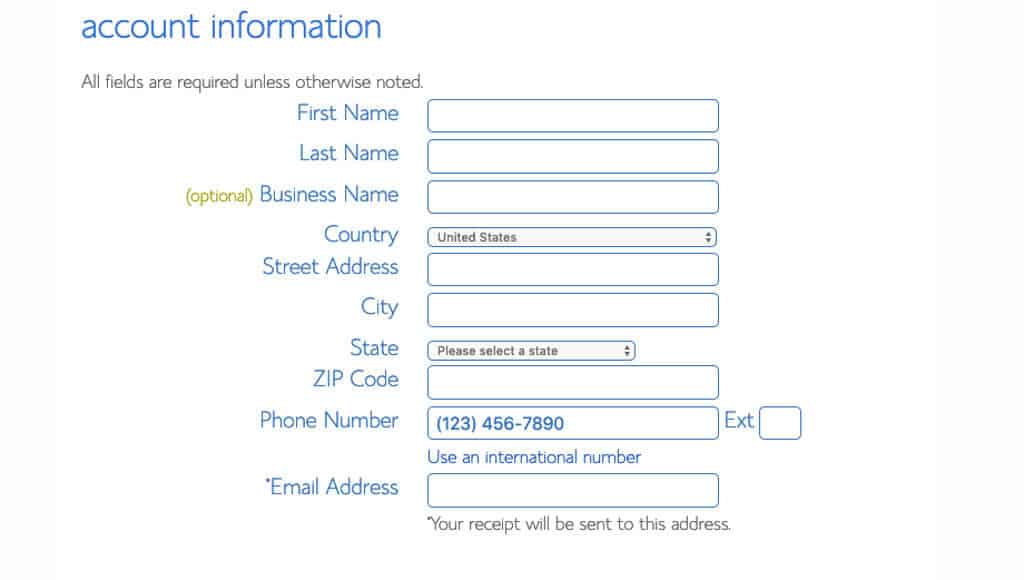
Finally, enter your payment information to continue.

STEP 5: Check Your “Package Information” and Finish Registration
The next step in registering for a Bluehost account is to select your plan and package.
These are the last steps you’ll go through before your account creation is complete. Pay close attention to the extra options available, like Domain Privacy Protection.

Consider the add-ons (optional)
Bluehost offers tons of great add-ons: Most of them aren’t necessary, but here are some add-ons to consider.
Domain Privacy Protection: It is only $0.99 cents more per month. It will keep your personal information, e.g. your name and address, private.
If you want to keep your website and domain information anonymous, spend the extra $0.99 per month. If you don’t, be sure to uncheck this box.
SiteLock Security: This add-on verifies your email address, physical address, and phone number. If you plan to sell a product or service on your site, this feature might be helpful for proving your credibility to customers.This service is an extra $1.99 per month, or $23.88 per year.
Codeguard Basic: This provides extra security to your website. WordPress is very secure, but this extra feature allows you to backup your site regularly.
If anything happens, or if you make a mistake, it will be easy to turn back the time and revert to one of the previous backups of the site. If you think you’ll use this feature, it’s definitely worth the extra $2.99 per month.
Bluehost SEO Tools Start: Bluehost claims that this tool can help you get search engine rankings. This feature is $1.99 per month or $23.88 per year.
Office 365 Email Essentials: A safe and reliable email platform powered by Microsoft, with online access to email and calendars from any device or web browsers. $2.99 per month.
Once you’ve selected your add-ons and signed up for a Bluehost account, you’ll be all set to build websites using your chosen or existing domain name.
Log in to Bluehost and pick the website builder of your choice: WordPress, Joomla, or Drupal.
STEP 6: How to Install WordPress with Bluehost’s ‘One-click-installation’
Bluehost offers “one-click installation” for WordPress, Joomla, and Drupal for beginner users so that you can have your site ready to go in seconds.
Just click on your preferred website software below and the guide will expand (with images).
Once you’ve chosen a domain name and you’ve registered for an account with Bluehost, you’re ready to build with WordPress
To begin creating a WordPress site, log into Bluehost. Head on to “My Sites” and click on “Create Site.”
1) You’ll begin by selecting a WordPress theme for your website. Don’t worry too much about your selection – you can change the theme later if you change your mind.
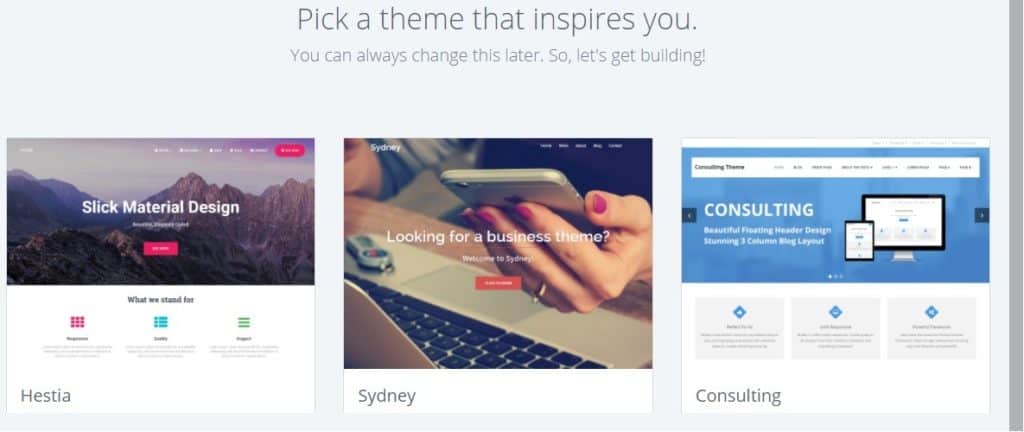
Once you’ve chosen a theme, log in to WordPress with the button on the left-hand side of the screen and start putting your site together piece by piece.
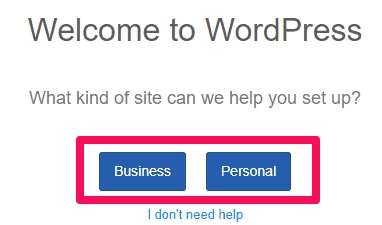
2) Next, you’ll be prompted to select which kind of website you’d like to set up. Select whether you’re looking to create a “Business” website or a website for personal use.
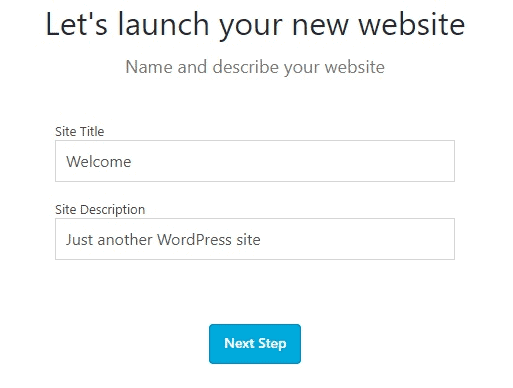
3) Once you’ve made a selection, fill out the Site Title and Site Description of your choice.
4) Moving on to the next step, you’ll be prompted to select whether you plan to update your site with news and blog posts.

If you don’t, you can move on to the next step. If your site will be updated regularly with news and blog posts, select what visitors will see on your homepage.
You’ve got two options here: your most recent news and updates, or a static welcome page.
If you plan to use your website as a blog or news source, I recommend choosing the first option so that users will see your new posts as soon as they visit your page.

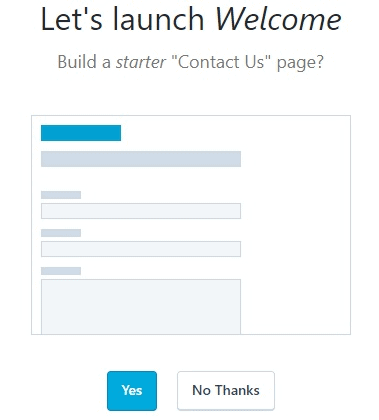
5) Build a basic “Contact Us” page if you want to provide users with a form to contact you or your company.
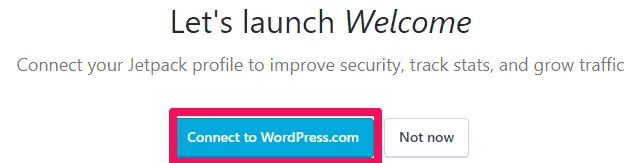
6) Finally, you’ll need to connect your Jetpack profile to WordPress to improve security, grow traffic, and track statistics.
You can choose to do it later, but I recommend connecting Jetpack to WordPress as soon as possible to speed up your site creation process.
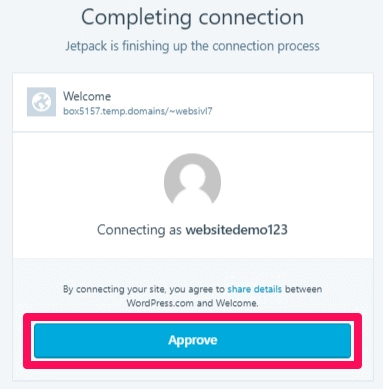
Approve the connection process for your website and Jetpack by clicking the “Approve” button
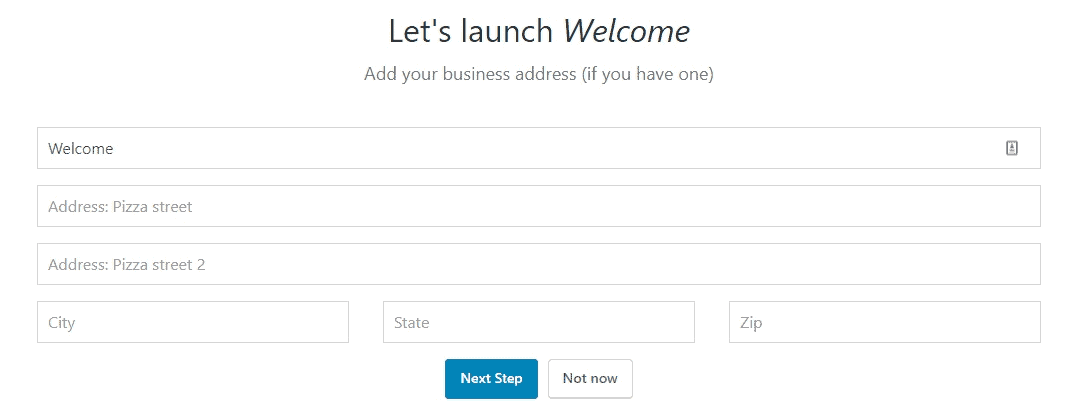
Then you’re almost ready to launch your site! Add your business information or click “Not now” if you want to add it later.
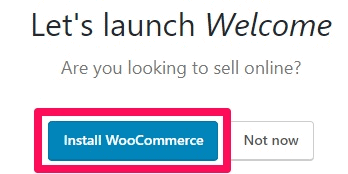
7) Be sure to install WooCommerce if you plan to sell products or services on your website.
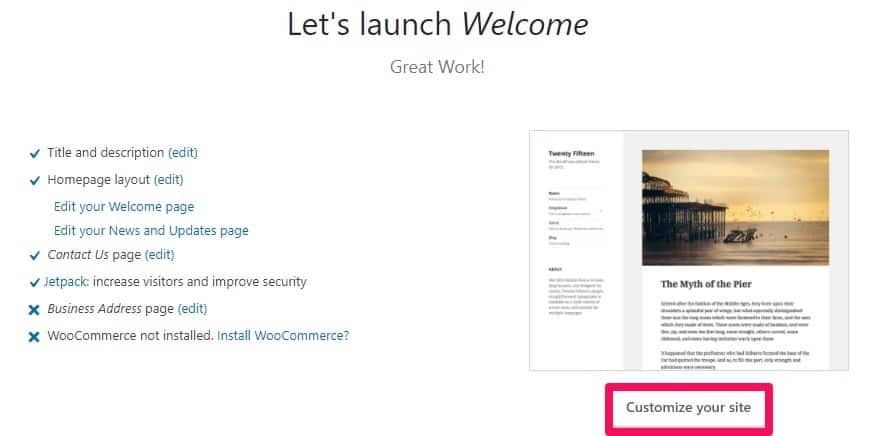
8) Now you’re all done and your website will be ready to launch!
If you decide you want to customize more options before you launch, this is the time to visit the “Customize your site” area to double check your selections.
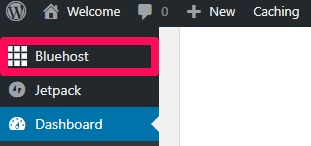
You can go back to your Bluehost dashboard by clicking “Bluehost” on the left side of the control panel.
When you’re happy with your selection and you’re ready to launch your site, hit the “Launch” button!
Once you hit this button, your WordPress site will be live.
That’s it, your website is up and running now!
If you have any comment or Question you can drop your comment below


After a long time, I read a very beautiful and very important article that I enjoyed reading. I have found that this article has many important points, I sincerely thank the admin of this website for sharing it. Best wordpress installation service service provider.
ReplyDeleteYou have a genuine capacity to compose a substance that is useful for us. You have shared an amazing post about Website Hosting. Much obliged to you for your endeavors in sharing such information with us.VPS Reseller Hosting
ReplyDeleteI by and large need quality substance and this thing I tracked down in your article. It is valuable and critical for us. Continue to share these sorts of articles, Thank you.Custom Website Development Services
ReplyDelete